
When it comes to developing, maintaining and sharing your own Python package, several tools come into play. A tool set commonly used by developers for this purpose looks as follows:
- pip: a package manager to install and manage software packages written in Python.
- PyPi: a remote repository containing Python packages developed by the community.
- git: a local version control system.
- GitHub: a remote service for hosting your git repository.
- python3 -m venv: a command for creating isolated Python environments
(Please note: works on Python 3.3 or later). - setuptools & wheel: tools for generating the distribution archives required for publish your package on PyPi.
- twine: a tool for uploading the distribution archives you just created, to PyPI.
There are many excellent resources on the web for each of these tools individually (the links above give you already some idea). However, I found finding resources showing how these tools are combined to get the job done, a bit harder.
In this post, I will try to fill this void by presenting “the big picture” of Python development.
The Big Picture
As an example, we consider setting up the environment for developing, maintaining and sharing a Python package called “factors”. Here comes the big picture:
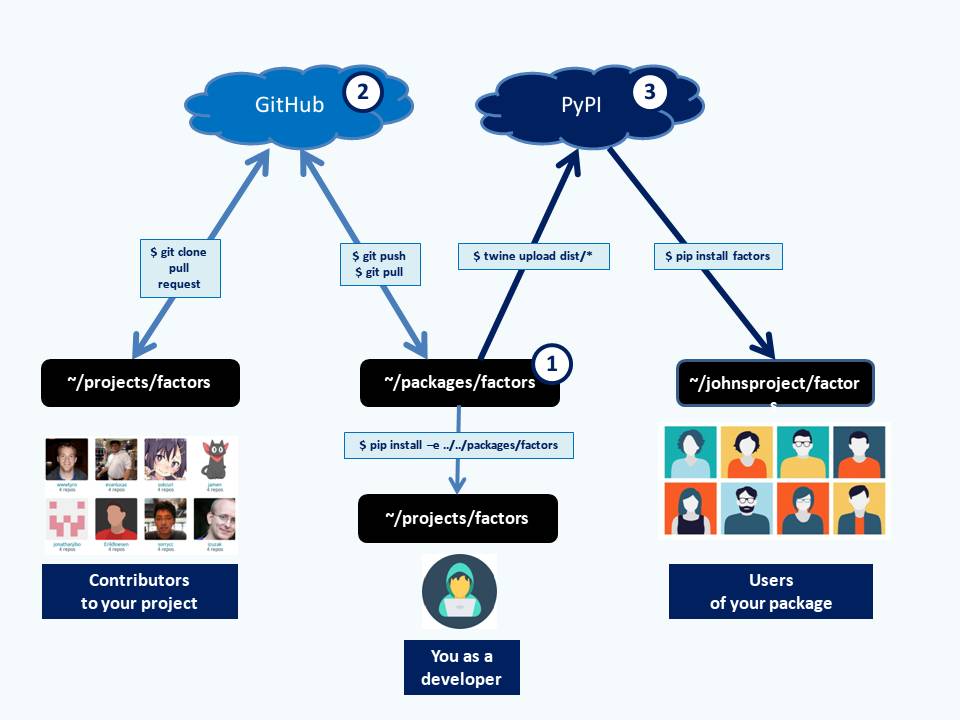
The picture shows that the process basically involves three groups of activities (a.k.a. “patterns”):
- setting up a local environment for developing the package;
- storing the development history on a remote service like GitHub, facilitating easy cooperation with other developers;
- publishing the package on PyPI so that other end users can easy install your package on their own machine.
In the remainder of this post, I will elaborate a bit on each one of these three patterns.
Pattern #1 : setup a local working directory
What is this pattern all about? This step involves creating a new directory for your new package, bringing it under version control and creating/activating a separate container (a.k.a. a “virtual environment”) for installing the appropriate dependencies.
What are the benefits? Now you can start developing incrementally while the version control system (git) takes care of tracking your changes, allowing you to roll back to earlier versions, if required. Thanks to the virtual environment, you can rest assured that your project packages are only using their own Python packages (a.k.a. “dependencies”), regardless of the dependencies used by your other projects.
What should I keep in mind? As a developer, it’s remains your responsibility to commit your changes to your local repository in a timely and organized manner. It takes practice to keep track of the branch (“master”, “develop”, “feature-branch”, etc) you are working on. Don’t forget to activate the virtual environment that matches the project you are working on.
Pattern #2 : interact with other developers using GitHub
What is this pattern all about? This step involves creating a new repository on a hosted version control system, like GitHub. After defining the URL your local git repository will get pushed to, you can push your local repository to GitHub.
What are the benefits? If your computer crashes, you can rest assured that your wonderful code won’t be lost as a (recent) copy will now be stored on GitHub. Out of experience I can tell you: losing your project code is no fun! At the same time, it’s hard to underestimate the value of working together with other developers keeping track of the changes they bring forward.
What should I keep in mind? As a developer, it remains your responsibility to push your changes to your remote repository in a timely and organized manner. Commit changes first to your local repository before pushing them to remote. Important commits that reflect a new release should be tagged (more on this in a later post). Be aware of the branch you push to remote.
Pattern #3 : share your package with end users using PyPI
What is this pattern all about? This step involves creating two distributions archives and uploading them to PyPI.
What are the benefits? End users can now simply install your package on their own local machines.
What should I keep in mind? Creating a “good” setup.py file requires some practice as it contains several fields describing your package. Fortunately, many examples can be found on the web. Make sure you update the version number before uploading a new version to PyPI. Your package name should be available on PyPI as each package on PyPI has a unique name. If you have a name for your package in mind, check its availability on PyPI first.
Packages versus Projects
A package can be defined as a standardized piece of software that can be easily installed and used by other people. A project, on the other hand, can be defined as a collection of scripts intended to solve a specific problem for yourself or for your client. Most of the time (at least in my case) most of my coding adventures start out as a project, they are intended for for sharing with a limited group of people only. Once I see myself reusing some parts of the same project over and over again, time has come to standardize some of the project functionality into a package. The patterns #1 and #2 apply both to packages and projects. Pattern #3 applies to packages only.
In our next post, we will glue some code to each one of the three patterns mentioned above, to be used as a reference (or sheet cheat as you will) in our upcoming coding adventures.
Acknowledgements: I would like to express my gratitude to Michael van der Waeter for his valuable input on Python development.